Tuesday September 15, 2009
Maybe yes, maybe no? But I am always willing to try new things and explore the possibilities that an opportunity may be right around the corner. I guess that is what makes me both an optimist and entrepreneur. So when my friend Joanna Roche asked me to help out one of her clients who has a neat line of handbags (some even for knitting and needlework projects) I had to help out. (check out
www.lexiebarnes.com) Lexie was debuting her bags at Fashion Week in NYC and needed sponsors and support for her "press lounge" where she hosted a "knitting lounge." So I had to come up with something for the goodie bags well knowing that the rail thin models and weight-obsessed industry would be at the receiving end. So nuts seemed to fit the bill. And I, of course, thought this could be a fun way to get the word out about Heirloom Meals and my quest for sponsors or strategic partners. Finger are crossed for Lexie and me - two independent, creative women with a dream!!
By the way - my nuts are hardly dietetic - but a small bag is really quite satisfying.
So here's my recipe for Spicy Curried Walnuts. They make excellent bar treats, great hostess gifts and are fantastic in a salad.
1 lb walnut halves
1/2 cup sugar
3 1/2 tablespoons canola oil
1/2 teaspoon salt
1/4 teaspoon pepper
1/4 teaspoon cayenne
1/2 teaspoon coriander
1/2 teaspoon ground ginger
1/4 teaspoon ground cloves
1 1/2 teaspoons cumin
Preheat oven to 325 degrees.
First you need to blanch walnuts for about a minute in boiling water. Drain and toss well with sugar and oil. Let stand for about 10 minutes.
Prepare a baking sheet by lining with parchment paper. Spread walnuts in a single layer and place in the middle of the oven. Check and turn the walnuts every 7-10 minutes until golden. I find the process is about 25 minutes but be careful - one extra minute can turn your golden nuts black. Remove golden nuts and put in a large bowl. Mix all spices and then toss with the warm nuts. Spread nuts in a single layer to cool. Once cool, store in a sealed container and Enjoy!!
Wednesday September 02, 2009
Saturday, September 5th is fast approaching and I am diligently preparing for the food demo I will be doing on NBC's Albany affiliate Channel 13, WNYT - the morning show with Jessica Layton at 8 am.
Here's a sneak peek at my recipe. I am doing a batch today for practice and propping - you know - the magic of television.
Corn Relish
4 cups white wine vinegar
1 1/4 cups sugar
2 Tbsp salt
8 cups corn kernels, either fresh or frozen
4 cups red and green pepper, seeded and diced
1 3/4 cups celery, diced
1 cup onion finely chopped
2 Tbsp dry mustard
2 tsp celery seeds
2 tsp ground tumeric
2 Tbsp Clearjel (a thickener) Available on www.kingarthurflour.com
1/4 cup water
Equipment: boiling water canner,canning jars, canning funnel, rubber spatula, jar lifter and/or tongs
First, prepare your jars as follows:
Place cans on rack of boiling water canner, add water until the pint jars are about 2/3rds full. Cover and bring to a simmer. This process kills any bacteria. In a small saucepan, place the lids - the flat, round piece, cover and bring to a simmer. The screw bands do not need to sterilized.
Then, start your vegetables:
In a large saucepan, combine vinegar, sugar and salt. Bring to boil, stirring to dissolve sugar. Next add the corn, peppers, celery and onion. Continue stirring and keep the mixture boiling. Stir in the mustard, celery seed and tumeric. Separately, in a small bowl, make a paste out of the water and Clearjel and then add it to corn mixture. Stir frequently and gently boil until it mounds on your spoon (about 5 minutes.)
Now you are ready to start canning your relish:
One jar at a time, remove from canner, pouring hot water back into canner, place jar on flat heat-resistant surface. Ladle relish into jar leaving about a half inch of headspace, wipe the rim and threads with a paper towel. ( This is important to make sure vacuum seal can occur). Lift a hot lid with your tongs and place on jar and then screw the lid with your fingertips until tight. Place back in canner with tongs. Repeat until done.
Cover all jars with additional water by an inch or so. Cover canner and bring to a boil. The boiling must be continuous and rapid for 15 minutes. Remove lid, let sit for about 5 minutes or so. Remove jars without tilting, place jars on a towel in a draft-free spot and allow to cool for 24 hours. Store in a cool dark place for up to a year.
This recipe will yield about 6 pint jars. Enjoy!!
Sunday August 30, 2009
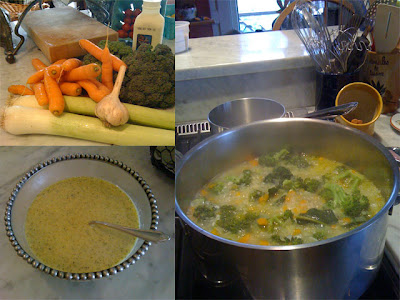
Nothing like a raw, unseasonably cool day to make me want to make soup. And fortunately, I had every single ingredient I needed on hand AND it was farm fresh....broccoli we just picked from our garden, leeks, carrots and garlic from the CSA and High Lawn Farm heavy cream. I even had vegetable broth in the freezer awaiting just this confluence of events. So, I figure when the food gods line up like that then I have no choice.....
Here's the recipe for Cream of Broccoli Soup - out of my Mom's archives of recipes with a note on top that says, "excellent." Oh and Julia Child would be proud - I used butter and heavy cream.
9 tablespoons butter
1 1/2 cups leeks, minced
1 1/2 cups carrots, minced
2 garlic cloves, minced
6 cups chicken or vegetable broth
1 1/2 heads broccoli, cut into small florets
1 1/2 cups heavy cream
1 1/2 pinches cayenne pepper or to taste
1 1/2 teaspoon celery seed
salt and pepper to taste
In a pot, melt butter over medium heat. Add leeks, carrots, garlic. Cook until tender but be sure not to brown (about 5 minutes).
Add the broth and bring to a simmer. Add the broccoli. Cook 8-10 minutes until the broccoli is tender.
Pour the soup into a processor (may need to do in batches) and process until veggies are finely chopped but not pureed. Pour soup back into pot. Stir in cream, celery seed and salt and pepper. Reheat before serving or freeze in batches as you await another cool day!!
Enjoy!
Serves 8-10.
p.s. You can leave out the cream entirely or exchange it for half and half or milk. When using great ingredients it's divine any way you eat it. I've got my 13 year old step son that prefers the heavy cream!!
Sunday August 30, 2009
I have exciting news!! As many of you know I am on the board of Berkshire Grown. (http://www.berkshiregrown.org). Berkshire Grown has designated the month of September to "preserving the bounty" and many of the restaurant members and myself agreed to host workshops. My workshop is on September 17th and we'll be making corn and black bean salsa and, warm bath preserving kale or other fall greens. As part of the promotion, Channel 13, the NBC Albany affiliate, will be doing 2 segments. And, here's the news, I will be doing a 4-5 minute demo on air this coming Saturday, September 5th at 8 am.
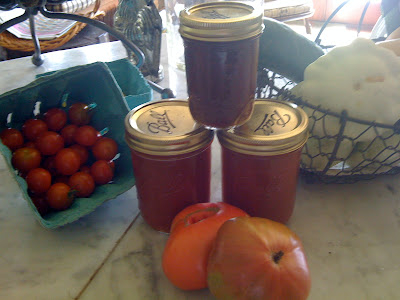
I am gearing up and trying to hone in what I will do on the segment. I am most comfortable with tomato canning and was reminiscing about last year's tomato harvest and my jars of tomato sauce, salsa and ketchup so I thought I would share my tomato sauce recipe for old times sake:
Nana's Basic Tomato Sauce
Rule of thumb - 5lbs of tomatoes yields one quart of sauce.
Other tools: boiling water canner,canning jars, canning funnel, rubber spatula, jar lifter and/or tongs, fine sieve or food mill
Citric Acid (available where you buy canning supplies)
Wash and cut up tomatoes, place in stainless steel saucepan and bring to boil over medium-high heat. Using a slotted spoon crush tomatoes to release juices. Boil until tomatoes are soft and then remove from heat. In batches, press tomatoes through a fine sieve (what my grandmother used) or a food mill (what I use) which removes the seeds and skin. Return the skinless, seedless tomatoes to the saucepan over medium to high heat, stirring occasionally until the liquid is reduced to 1/2 for a nice medium thick sauce.
Meanwhile, you can be getting your cans ready - place cans on rack of boiling water canner, add water to until the pint jars are about 2/3rds full. Cover and bring to a simmer. This process kills any bacteria. In a small saucepan, place the lids - the flat, round piece, cover and bring to a simmer. The screw bands do not need to sterilized.
Now you are ready to start canning your sauce. One jar at a time, remove from canner, pouring hot water back into canner, place jar on flat heat-resistant surface. For a quart, add 1/2 tsp citric acid, then place funnel in jar, ladle sauce into jar leaving about a half inch of headspace, wipe the rim and threads with a paper towel. ( This is important to make sure vacuum seal can occur). Lift a hot lid with your tongs and place on jar and then screw the lid with your fingertips until tight. Place back in canner with tongs. Repeat until done.
Cover all jars with additional water by an inch or so. Cover canner and bring to a boil. The boiling must be continuous and rapid for 40 minutes. Remove lid, let sit for about 5 minutes or so. Remove jars without tilting, place jars on a towel in a draft-free spot and allow to cool for 24 hours. Store in a cool dark place for up to a year.
Invite friends as the process is fun but laborious. My grandmother used to say many hands make for light work. We didn't add seasoning as my grandmother liked to use the basic sauce as her blank canvas to embellish as she used it for different dishes.
....but what shall I do for the demo - beets? raspberries? Stay tuned!!
Thursday July 30, 2009
These past two weeks are among my favorite - the pick your own blueberry farms are open and blueberries abound at most farm stands and farmer's markets. And of course I stuff my face until my mouth is blue, reveling in all the antioxidants this dark super food is delivering to my body. But I also love to bake with them. One of my favorite things to do when I was a kid in the summer was to bake blueberry muffins or blueberry coffee cake.
Here is one that uses yogurt for an even more healthful indulgence:
Blueberry Yogurt Coffee Cake
This recipe has been in our stable of recipes as far back as I can remember. My Mom and grandmother made certain there was always yummy homemade baked goods in the house. This was a special weekend breakfast treat. I used to view it as breakfast dessert. We were big yogurt eaters so it’s not surprising that we baked with yogurt. I now love the new flavors like banilla that add a special twist - but plain usually does the trick!
For the Topping
1 cup sugar
1 teaspoon cinnamon
2 tablespoons butter, chilled and cut up
For the Cake
8 tablespoons (one stick) butter, softened
1 1/2 cups packed brown sugar
1 egg
1 teaspoon baking soda
2 cups flour
1 cup plain yogurt
1 teaspoon vanilla extract
2 cups blueberries (fresh or frozen)
Preheat oven to 350 degrees. Butter a 9 x13 baking dish. Using a fork, blend topping ingredients in small bowl and set aside. Cream the butter, brown sugar and egg (I do it by hand with a fork, but a mixer works wonders!) Add baking soda, flour, yogurt and vanilla and mix on medium speed for 2-3 minutes. Pour cake batter into prepared baking dish. Sprinkle berries over top and gently push into batter and then sprinkle sugar topping over all.
Bake 45-50 minutes. Cool and cut into squares. Enjoy!
Wednesday July 15, 2009
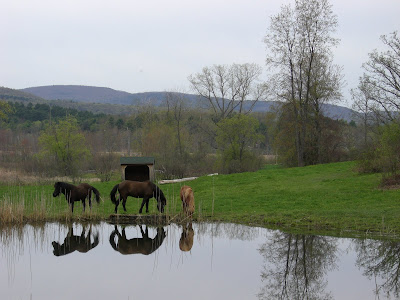
I have been absent from my blog for a few weeks. I have so much to report. Some happy, some very sad. I'll start with the sad. Around midnight Sunday, my border collie, Burtee began barking which alerted me to some banging in the barn. I got my flashlight and saw my horse Valkyrie rolling furiously. And I knew it was colic....Jim and I rushed to the barn to get her up to no avail. We called the vet (Dr. Stephanie, a beautiful compassionate young woman) who was out on another emergency and said she could come right over. She arrived around 1 am and we tried a stronger muscle relaxer and pain killer and got Valkyrie up. The Doc did not like what she found when she did the internal exam and suggested emergency surgery. Alas with no trailer available at 2.30 am and a 2 hour drive to Tufts, we were disheartened and confused. Our only option was to keep her pain free and pray that she would feel better. Dr. Stephanie left us with medicine to help us get to daylight and to reach my friend with a trailer. She returned at 7.15 am and Valkyrie had gotten worse. It pained us to see her suffer for one more minute and we had to make the decision to euthanize her. It was truly one of the saddest heart-breaking moments that I have had on this farm or in life. I have had a heavy heart for the last few days. I pray that my dear sweet Valkyrie lives on in the divine world from where horses are known to come.
I observed the other horses were painfully aware that something happened to their friend and one's mother. The baby (who is now three) whinnied for her mother and the other two horses expressed such compassion and love. They circled Gaefa, kissed her, groomed her and have not left her side. The herd is in mourning but they are supporting each other - their behavior has helped lift my sadness.
But before all this sadness, new living creatures have joined life on the farm. On June 27th we welcomed three Scottish Highland cattle - Julia, a three-year old, Delilah, a 9 month old and an unnamed 9 month old bull. I will write more on our new herd, our intention to raise grass-fed beef and the experience of this new journey. And last Tuesday the 7th we got 12 new egg layer chicks and 12 broiler chicks.
Life on the farm places the realities of the cycle of life front and center. I am not sure that I factored that into our decisions to get farm animals, but it has both sobered and strengthened me. Somehow I think the barnyard has a lot more yet to teach me.
Page 87 of 88 pages ‹ First < 85 86 87 88 >


