Kathy Mangan’s Irish Soda Bread: Swinford Spotted Dog (from her Grammy Mangan)
Ingredients
- 2 cups flour (not self-rising flour. Unbleached is best)
- 1 Tbsp sugar
- 1 1/2 tsp baking powder
- 1 tsp baking soda
- 1/4 tsp salt
- 1 1/2 tsp Caraway Seeds (optional)
- 1/4 cup butter, softened (butter preferred over margarine)
- 3/4 cup Raisins (Plump them in hot water if dry and hard)
- 1 cup Buttermilk (more or less)
- 1 egg Slightly beaten with 1Tablespoon water (for the top of the bread)
Directions
- Grease a baking sheet with margarine. Set oven to 375 degrees.
- Press the baking soda through a small wire mesh strainer because any lumps will turn green after the bread is baked. Also put the baking powder though the strainer so there are no clumps. Mix together dry ingredients. Aerate the flour mix by lifting it up in the air with your hands and letting it float back to the bowl many times. You can also use a manual flour sifter to sift the flour into your mixing bowl, but this method is quicker and more fun.
- Cut the softened butter into small pieces with a knife and drop into your flour mix. Pick up handfuls of the butter and flour mixture, and use your hands with your thumbs moving back and forth across your finger tips to mush the butter into the dry flour mix. Keep at it until there are no more big clumps of butter, just shreds or balls that look like peas mixed with the flour. The mix does not have to be a consistent texture. (As an alternate technique to using your hands you can use a french pastry blender to cut the butter into the flour with a twisting motion of the pastry blender, but don't do it to the point that the butter is worked in super fine. This overworks your dough and makes it tough.)
- Add the raisins to the mix with a light stir.
- Make a well in the center of the dry mix, and pour about half the total amount of buttermilk into the well. Using a wooden spoon, go around the outside of the bowl turning the spoon over into the middle to try to get the dry ingredients wet without too much stirring or working the dough. When it seems the buttermilk is integrated with the dry ingredients, add some more buttermilk, maybe half the remaining amount. Continue with the spiral stirring method from the outside of the bowl into the center, scraping up the dry ingredients on the outside of the bowl as you go. Add the remainder of the buttermilk a little at a time until you reach the right consistency for the dough – you do not have to use all the buttermilk. The dough should be sticky and wet, but it should form a clump in the middle of the bowl, separated from the sides of the bowl. It will seem too sticky, but that’s ok, as you’ll cover the outside with flour. The trick is to try to stir in the buttermilk pretty fast, not fussing with it, and not trying to get it all completely mixed and the batter smooth or an even consistency. You want to keep as much of the air in the flour/dough as possible to make the bread light and fluffy. If you stir it too much, your bread will be short, dense and tough. So give that batter some quick and firm stirs, but don’t worry about getting it all the same…be casual about how you mix it up, and don’t worry about it.
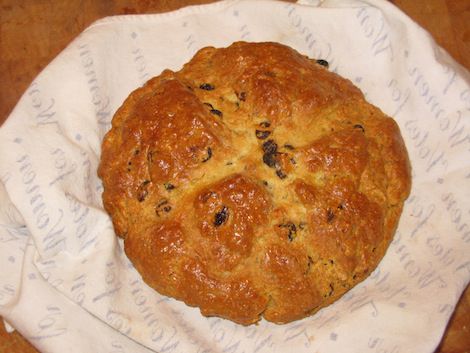
- Now for handling the dough – you will NOT knead it. In fact, you will touch it very gently, as you want to make sure that all the air pockets remain in your soft dough to make your bread fluffy. The less you handle your bread, the better it will be. All you really want to do is shape the sides of your bread into a nice round shape, and it should be about 2 inches tall. If you need to flatten it out a bit, do so very gently by pulling outwards to the side, not pressing down from the top. Pick up your round loaf with both hands (or use a spatula) and place carefully onto the greased baking sheet, then give it a final shape up and make it the 2-inch height. Take a long knife and flour the blade. (You can also just get it wet, so long as it doesn’t stick to the bread dough.) Then make a cut in the middle from one side to the other using a wiggling motion of the knife back-and-forth, side-to-side to make it about a half-inch deep and about a quarter-inch wide. Then flour the knife blade again (or get it wet and make sure there is no dough on the blade from the last cut). Make another cut across the bread in the other direction, so it looks like a cross on the bread. This has been done for centuries this way in order to let out the fairies; angering the fairies will bring you bad luck.
- Crack the egg into a small bowl, add a teaspoon of water, and take a fork or small whisk and whip it up. Take a pastry brush and brush the sides and top of the bread with the egg-water mixture as a glaze. (Note: you do not have to put the egg glaze on the bread, but it gives a nice browned look to the bread rather than a powdered, floury look.)
- Put the bread into the center of the oven and bake it at 375 degrees for about 30 minutes or a bit more up to 35 minutes depending on your oven. Check it by inserting a toothpick into the center of the bread and ensuring it comes out clean. You can also knock on the bottom of the bread, listening for a hollow sound. When done, take the bread out of the oven, take it off the baking sheet and put directly onto a wire cooling rack so the bottom doesn’t get soggy.
- Pour a little milk into a small bowl, and dip your fingers into it and sprinkle milk onto the hot bread as soon as it comes out of the oven, then cover the bread with a clean tea towel. You can also take the tea towel, get it wet under the faucet, wring it out as much as possible, and wrap the wet cloth around the bread. This makes the crust soft; you’ll see the steam rising off it!
- This soda bread tastes best when warm, but let it cool a bit under the tea towel to make it more moist. Plus, if the bread is too hot, it doesn’t cut nice, instead it tears. Cut this bread into wedges to serve, and serve it with real butter, plus jelly, jam or marmalade if you prefer. And of course, a hot pot of tea.
- Prep time: 1 hr
- Cook time: 30-35 minutes
- Total time: 1 hr & 30 minutes
Yield: 8-10 servings